

You can monitor in real-time the players’ data collected in your team’s activities.
To Start
Prepare for First Use


OHCOACH LIVE ULTIMATE (FOR X5 - LHP1 Users)
Install and Start Live App
1.
Prepare your iPad for live monitoring.
2.
Search and download OHCOACH Live Ultimate in the App Store.
3.
Launch Live App.
4.
On the sign-in page, enter your email and password and sign in.
5.
Choose the team you would like to monitor (if you are assigned to more than one team).
6.
The app will take you to the Activity List menu
Table Setting
1.
Click Settings on the top right of the app.
2.
Tap the Metric button.
3.
You can choose and customise the metrics that you want to see in the report on this page.
Plan Activity and Sessions
1.
Go to the Activity List menu and tap the + New Activity button.
2.
Enter the activity title in the field and tap the SAVE button.
3.
Choose the Activity Type.
4.
Tab the Edit button on the Player box and add all the players that are going to participate in the Activity.
a.
Tap a player’s profile in the Not in Activity zone to add the player to the activity.
b.
Tap a player’s profile in the In Activity zone to remove the player from the activity.
c.
Tap the Add All button to add all Cells connected with the Live App to the activity at once.
d.
Tap the Remove All button to remove all players from the activity.
5.
Tab the Add Session button on the Session box to add sessions.
a.
Enter the session title in the field and tap the SAVE button.
b.
Choose the Session Type.
c.
Tab the Edit button in the Player box to remove or add players from the Session.
d.
Clicking the Edit button in the Session Goal box will allow you to set the team goal for that specific session.
e.
You can also set the Individual goals by enabling the Individual Goal button.
f.
Click the Edit Activity button on the top left of the screen to finish creating the session.
6.
You are now ready to start Live Monitoring.

Note
Once the wifi logo of the player profile turns blue, this means the Cell and the App are successfully connected, meaning the app is ready to show the data of that Cell.

Start Live Monitoring
1.
Press the Play Activity button to start Live Monitoring.
2.
Press the bar that contains the Activity name to see Session details.
3.
Press the Play button of the session when that specific session begins. Please note you can play more than one session at the same time.
4.
You can edit sessions that are not being played even after you start Live Monitoring.
5.
Press the Stop button of the session when that specific session ends. When you finish the final session included in the Activity, the Live Monitoring will stop.

Note
If the app suddenly goes off during Live Monitoring and you return to the app, the app will ask if you would like to return to Live Monitoring and continue the recording process. However, the data while the app was off will not be restored.

Note
Please ensure that you do not leave the app or lock the screen on your iPad when the recording is in progress. This action could lose the connection between the iPad and the Cells.
OHCOACH LIVE (For X4 - APP1 Users)
Install and Start Live App
1.
Prepare your iPad for live monitoring.
2.
Search and download OHCOACH Live in the App Store.
3.
Launch Live App.
4.
On the sign-in page, enter your email and password and sign in.
5.
Choose the team you would like to monitor (if you are assigned to more than one team).
6.
The app will take you to the Activities menu
Plan Activity and Sessions
1.
Go to the Activities menu and tap the Create New Activity button.
2.
Enter the activity title in the field and tap the save button.
3.
In the Cell & Players section, tap Cells to add or remove the players from the activity.
a.
Tap a player’s Cell in the Not in Activity zone to add the player to the activity.
b.
Tap a player’s Cell in the In Activity zone to remove the player from the activity.
c.
Tap the Add Connected button to add all Cells connected with the Live App to the activity at once.
d.
Tap the Remove All button to remove all players from the activity.
4.
Tap the Add New Session button (’+’)
a.
Tap the players in the player list to add or remove from the session.
b.
In the Duration section, add or subtract time to set the duration of the session.
c.
In the Session Type & Description > Type section, enter the name of the session and tap a session type. If a session description is left blank, it automatically is named as a selected session type.
d.
In the Session Goal section, enter the minimum and maximum values for each metric to set a goal for the session.
e.
Tab the Save Session button to save the session.
5.
You are now ready to start Live Monitoring.

Note
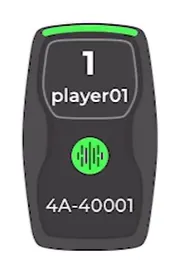
Once the top of the cell turns green, this means the Cell and the App are successfully connected, meaning the app is ready to show the data of that Cell.
Start Live Monitoring
1.
Click Play Activity once you have completed all the steps on the Plan Activity and Sessions part.
2.
Once the training begins, press the Play button.
3.
For each time the session is done, press the Stop button. The app will automatically take you to the break time.
4.
For each time the session starts, press the Start button again.
5.
If you press the Stop button on the final session, the app will automatically stop the Activity.

Note
Please ensure that you do not leave the app or lock the screen on your iPad when the recording is in progress. This action will lose the connection between the iPad and the Cells.
To Finish


Up Next